That time of year again… It’s Retrochallenge time!
Retrochallenge is where you challenge yourself to use vintage computers for a personal project for a month. This time, it’s for the month of October 2017. For my Retrochallenge, I will be rewriting an old Christmas graphic and sound demo I wrote on a real VIC-20 computer back in late 1981.
The demo itself is simple, but then again, so was the programming. Much of it was PRINT statements in a chain of BASIC commands, followed by music playback that was just as rudimentary. But now that I had over 35 years to contemplate my original code, I have decided to make it more efficient, modernize it, and make it even better if possible. After all, it ran on an Unexpanded VIC-20 originally. I really should have thought out ways of saving every precious byte available to me. One aspect of a successful “improvement” is to reduce the size of the program. However, if the program can be improved in its presentation, I won’t dwell on size reduction as a primary goal. After all, those kind of changes fall under the “efficient” and “modernize” aspect of change.
The tools I will be using consist of the following:
- My original VIC-20 (still works)
- My original program tape(s)
- CBMStudio (modern system convenience for writing native VIC-20 BASIC code)
- VICE (to test the program using VIC-20 emulation)
A demonstration of the original program can be seen on a YouTube video.
The program I’ll be working on first will be “Merry Christmas IV.” It is the 4th update of an original Merry Christmas demo I started on. The video will show the previous versions. Here is a preview of the program, in BASIC, as CBM Studio maintains it:
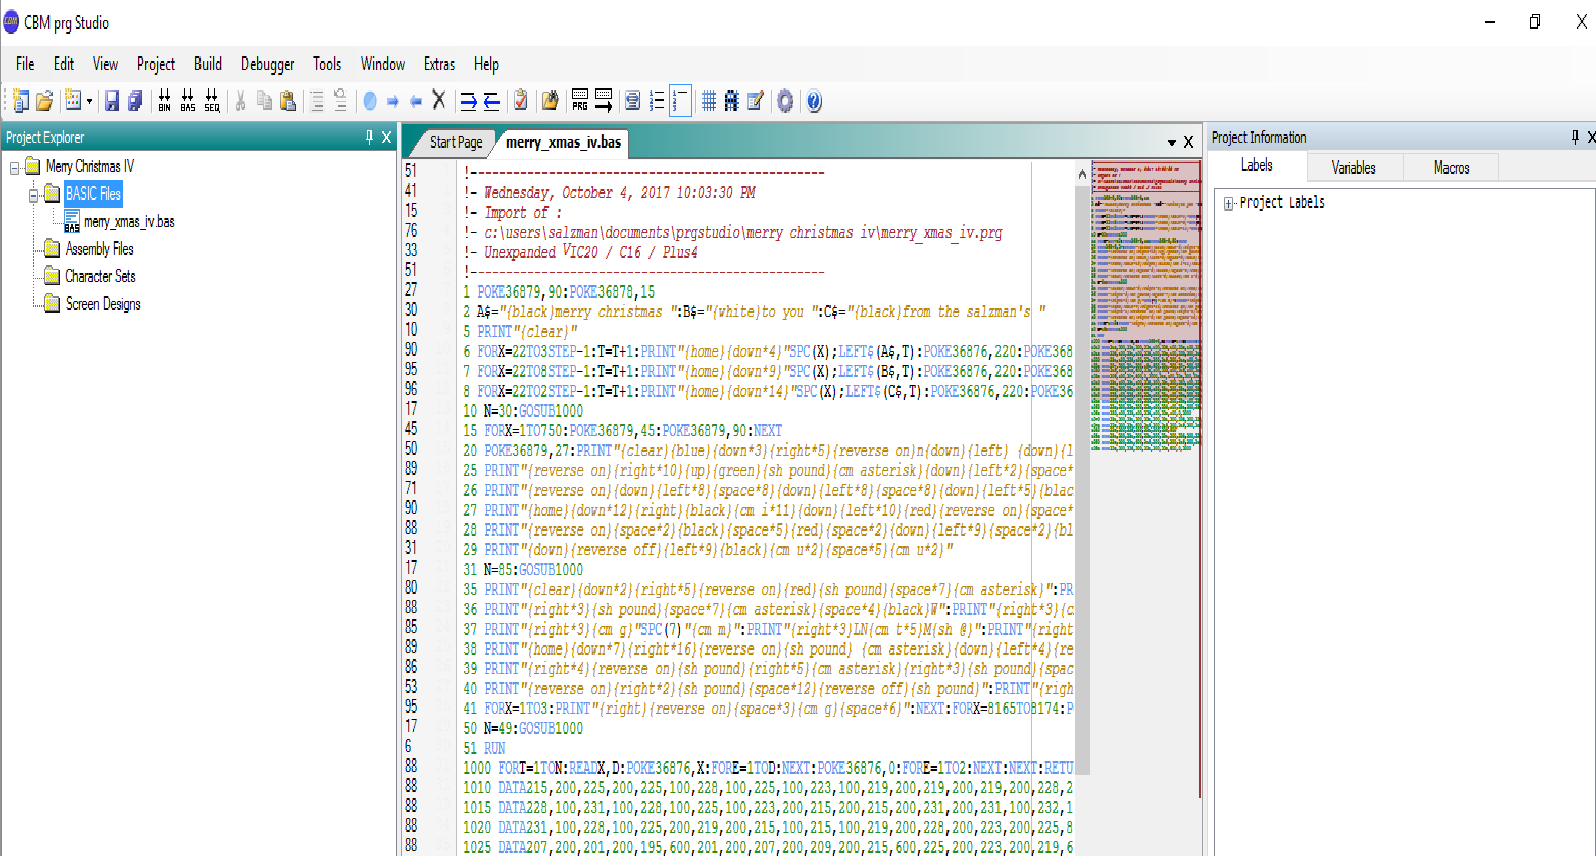
CBM Studio substitutes text commands in braces {} where a real VIC-20 will use special reversed graphic symbols. I will use that same convention with code segments I list in this blog post.
Now to break down the original code…
1 POKE36879,90:POKE36878,15
2 A$="{black}merry christmas ":B$="{white}to you ":C$="{black}from the salzman's "
5 PRINT"{clear}"
6 FORX=22TO3STEP-1:T=T+1:PRINT"{home}{down*4}"SPC(X);LEFT$(A$,T):POKE36876,220:POKE36876,0:NEXT:T=0
7 FORX=22TO8STEP-1:T=T+1:PRINT"{home}{down*9}"SPC(X);LEFT$(B$,T):POKE36876,220:POKE36876,0:NEXT:T=0
8 FORX=22TO2STEP-1:T=T+1:PRINT"{home}{down*14}"SPC(X);LEFT$(C$,T):POKE36876,220:POKE36876,0:NEXT
The above code sets the screen color, Defines three string variables for character animation, and then performs the character animations after clearing the screen. Very little, if anything, needs to be done with this section of code, unless I decide to change the animation style. Right now, it’s programmed to give the appearance of the text sliding in from the left, using a quick beep for each step movement to the left.
Something I could do with this section is create a variable array using three elements, save the text to each element, then loop through the array, placing the text as planned, but using calculated values in the FOR:NEXT loops based on variable size. I’m trying to remember if the Commodore V2 BASIC had a LEN() function to determine string length. I feel I’m a bit too jaded on newer programming languages to assume that functions like LEN() are available without checking.
This is what I did to change that section…
1 POKE36879,90:POKE36878,15
2 DIM A$(3)
3 A$(0)="{black}merry christmas ":A$(1)="{white}to you ":A$(2)="{black}from the salzman's "
4 PRINT"{clear}":PRINT"{down*4}"
5 FORY=0 to 2
6 SL=INT((22-LEN(A$(Y)))/2)+1
7 FORX=22TOSLSTEP-1
8 PRINT"{HOME}":FORZ=0TO(ABS(Y)*3)+1:PRINT"{DOWN}":NEXTZ
10 PRINTSPC(X);LEFT$(A$(Y),22-x)
11 POKE36876,220:POKE36876,0
12 NEXTX,Y
What I basically did was turn the repetitive code of the original lines 6-8 into a function like structure which uses calculated variables to determine line length of the scrolling text, along with calculated line spacing.
- Line 1
- Set screen colors.
- Lines 2-3
- Assign scrolling text to arrays.
- Line 4-5
- Clear screen. Set text starting line. Start loop to scroll text.
- Line 6-7
- Calculate the Sentence Length. Start text scroll loop.
- Line 8
- Move down number of lines corresponding to Y value times 3, HOME cursor then move cursor down
- Lines 10-11
- Print the appropriate segment of the line, followed by a click sound
- Line 12
- Loop X, then Y
The remaining sections didn’t get much of a makeover. I will detail them in the same manner.
14 N=30:GOSUB1000
- Line 14
- Set the number of music notes to play, then call the subroutine to play them
After the music plays, I originally intended (way back in 1981) that I wanted the screen and border to alternately flash in red and green. I though a simple for next loop would suffice for this.
15 FORX=1TO750:POKE36879,45:POKE36879,90:NEXT:POKE36879,27
While the above line does change the screen and border colors, it does it so fast that each change takes less than one monitor frame, thus creating a cool effect. I left that effect as is. The only question I have to this day is why the effect seems to slow down partway through the loop counter. It’s quite a mystery to me. It’s almost as if the VIC-20 is multitasking and some of the computing power is being used up by the system somehow. The last part of the line sets the color palette based on the auto-generated screen text defined by the PRGStudio screen editor.
For the Fireplace/Tree scene and Santa Clause screens, I figured there was little I could do to change those. So, I decided to try out the PRGStudio screen editor and redraw the screens exactly as I had them originally. Once I got past the learning curve of the design tools and color palette handling, I was easily able to recreate the screens. Here is one example:

The convenience of this editor is that it will export the screen data as BASIC statements. These BASIC statements can start at any desired number and be any desired increment. You just copy/paste the BASIC text into your editor. To create the screen above, PRGStusio generated these lines:
200 PRINT "{clear}{blue}{down*3} {reverse on}{blue}n"
210 PRINT " {reverse on} "
220 PRINT " {reverse on}o"
230 PRINT " {reverse on} "
240 PRINT " {reverse on}e"
250 PRINT " {reverse on} {reverse off} {reverse on}{green}{169}{127}"
260 PRINT " {reverse on}{blue}l{reverse off} {reverse on}{green} "
270 PRINT " {reverse on}{169} {127}"
280 PRINT " {reverse on} "
290 PRINT " {black}{175}{175}{175}{175}{175}{175}{175}{175}{175}{175}{175} {reverse on}{green}{169} {127}"
300 PRINT " {reverse on}{red} {reverse off} {reverse on}{green} "
310 PRINT " {reverse on}{red} {black} {red} {reverse off} {reverse on}{green}{169} {127}"
320 PRINT " {reverse on}{red} {black} {red} {reverse off} {reverse on}{green} "
330 PRINT " {reverse on}{red} {black} {red} {reverse off} {reverse on}{green} "
340 PRINT " {reverse on}{red} {black} {red} {reverse off} {reverse on}{black} "
350 PRINT " {reverse on}{red} {reverse off}{black}{169} {127}{reverse on}{red} {reverse off} {reverse on}{black} "
360 PRINT " {183}{183} {183}{183} {yellow}{127}{reverse on} {reverse off}{169}"
As an added note, Commodore computers used special reversed colored characters from the PETSCII character set to indicate screen formatting, color, and other text manipulation codes withing the quotes of a PRINT statement. PRGStudio cannot recreate those codes in the editor. Instead, the codes are represented as text in {} symbols, which when compiled, get converted to the PETSCII codes a real Commodore computer can understand.
I won’t show the lines for the other screen with Santa Clause. The process is nearly identical.
Finally, I had to decide how I wanted to redo the music routine. What is there is pretty simple already. I believe I copied the routine directly from the VIC-20 Programmer’s Reference Guide, and to paraphrase a popular quote:
Those who can, do. Those who can’t, CHEAT! 😛
The routine is simple. Start a FOR:NEXT loop. READ two DATA values. The first value is the tone number, the second value is the duration (in milliseconds). Repeat until out of DATA. I had to track the number of DATA values by providing a count of notes as mentioned above.
The only improvement I could make to this code is to make the duration values a whole fraction of the original values. Almost all durations in the music were multiples of 100. Since part of my project was to make a smaller file, I can divide all durations by 100, then only add a single “times 100” multiplier in the play routine. I’ll save approximately (Number of Notes) * 2 bytes of data by doing so.
In the end, the code for the music routine looks like this…
1000 FORT=1TON:READX,D:POKE36876,X:FORE=1TOD*100:NEXT:POKE36876,0:FORE=1TO2:NEXT:NEXT:RETURN
1010 DATA215,2,225,2,225,1,228,1,225,1,223,1,219,2,219,2,219,2,228,2
1015 DATA228,1,231,1,228,1,225,1,223,2,215,2,215,2,231,2,231,1,232,1
1020 DATA231,1,228,1,225,2,219,2,215,1,215,1,219,2,228,2,223,2,225,8
..etc
The code above reflects the changes in the duration values for the music tones. They have already been reduced by 100.
And… that’s about it for my Retrochallenge. As usual, I could not commit much time to the event, which is unfortunate, because I love using my vintage computer systems. The real question is, “Did I meet my goal?”
I would say I met my goal 75%. The primary goal was to reduce the file size. The new version is 2662 bytes in size. The old version is 3190 bytes in size, making the new version 528 bytes smaller. That is a significant amount for a computer with 3581 bytes of usable RAM.
Last, but not least, YOU want to view the program in operation. That’s easily done on the Internet using Matt Dawson’s cool Java based VIC-20 emulator. Go to the following URL in another browser tab:
https://www.mdawson.net/vic20chrome/vic20.php
When you get there, choose Storage | Carts/Programs | Load Prg from URL and past the link below into the prompt. The program will start immediately.
http://www.vintagevolts.com/merry_christmas_v.prg
There’s a bug in the emulator implementation which requires you to click on another top level menu item to close the sub-menus opened while trying to load this program. Don’t worry, the demo repeats itself, so you’ll get to see the whole thing.
You should also be able to download the .PRG file directly using the above link if you want to run the program on your computer through VICE emulation, or transfer it to disk for a real VIC-20.
Enjoy!