This project started as a need to come up with a solution for my Amiga 1200 that recently suffered floppy disk failure. Although I am able to attach an external floppy drive to the system, I wanted to have every opportunity available to me to get software into the system through other sources. Sources that are self-contained within the Amiga 1200.
I learned that there are still IDE based SSD laptop drives you can buy brand new. I thought that if I had a sufficiently large drive, I can just put all of my original floppy disks, archived as ADF files, on its own large partition of a 32GB or 64GB drive. I can then install those “disks” as a RAM disk on demand directly from the archive using tools like Disk Image GUI (http://aminet.net/package/disk/misc/DiskImageGui). Using tools such as WHLoad, I can also install a number of games to their own partition, running those on demand. Amiga games did not take up a lot of space by today’s standards, so I should have plenty of “elbow room” in a sufficiently sized GB drive, as opposed to the MB sized drives in the Amiga’s original heyday.
Caveats
The Amiga was designed during the aforementioned “MB” days. It was generally conceived that there was not going to be any affordable storage medium higher than 4GB in size. If 4GB was all the space I wanted, I wouldn’t be writing this post in the first place. I could just create two 2GB partitions in WB3.1 and be done with it with little hassle.
But… it’s far easier to find much larger SSD drives today than it is to find a 4GB SSD drive. At first, I tried to use an 80GB IBM TravelStar (platter) drive I had lying around, just to see if I can get any kind of large disk support working. However, the drive itself was bad. It made lots of whirring and clicking sounds and would not even be recognized in a Windows system.
I thought about using a CF card solution. It’s a very popular means for adding any kind of SSD option to an Amiga 1200. However, I wanted a very large capacity device, and I was also worried about the load leveling that eventually happens with a CF card that is put under constant use as a working operating system drive.
Also, once you configure your large drive in this fashion, if you ever boot from a floppy disk, you will probably not have access to any partitions that start or span the 4GB point in the hard drive storage space, unless you are able to add the scsi module patch described later in this tutorial to the boot floppy.
So, I began to do some research…
In actual practice
One of the first things I tried was to jump right in with an obsenely large drive (by Amiga standards) and see what I can do. So I ordered a 128GB mSATA drive and an mSATA to IDE adapter from Amazon. Go big or go home, right? If this drive combo didn’t work in the Amiga, I could at least use it in an old IDE based laptop.
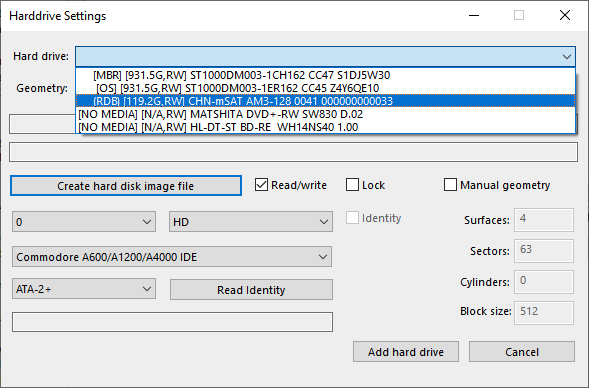
When I got the drive, assembled it, and was ready to use it, I decided I would try out the installation of large disk support through the use of the WinUAE emulator. I REALLY love this emulator as it easily supports hardware hard drives, mounting them as if they were installed in an actual Amiga. I had an IDE to USB adapter, so I hooked the mSATA drive to my PC and mounted it as a hard drive in WinUAE, like so:
Before I go any further, let me give you a little foreshadowing… the mSATA and IDE adapter I first tried to use did not work in my actual Amiga 1200. It worked fine in emulation using the uaehf.device included with WinUAE (described later). The primary reason I believe it did not work is that a real Amiga 1200 requires the IDE device to support PIO-0 mode. I think the fairly new mSATA-IDE adapter takes shortcuts in its hardware emulation and completely excludes PIO-0 compatibility. Hardly any new IDE device is expected to fall back to the low, slow PIO-0 standard, except for this drive I bought on the recommendation of 10 Minute Amiga Retro Cast in a YouTube video (https://youtu.be/mLpDG2K0NmU), which is a modern 64GB IDE SSD from Amazon. It supports PIO-0, and makes the Amiga 1200 happy.
https://www.amazon.com/gp/product/B008RWKFYE
And now… back to the mSATA activity
The drive was identified by WinUAE as “CHN-mSAT.” Note that in order for WinUAE to see these drives, WinUAE must be run in Administrator mode. So when you launch WinUAE, you need to right-click its icon and “Run as Administrator.” You will also see that I chose the “Commodore A600/A1200/A4000 IDE” interface. This allows WinUAE to treat the emulation as if it is using the real A1200 IDE port. This MAY work for many drives, however, if you have a problem saving partition changes discussed later on in this tutorial, there is an option to use a “uaehf.device” instead. So if you really don’t want to take the chance of having to repeat this section of the tutorial again, feel free to choose the uaehf.device option now if you want.
With that selected, I followed some of the instructions I found in the following YouTube video:
In essence, I downloaded the Amiga files listed in the video description, including the files needed to use the Professional File System (PFS) for the Amiga. PFS is intended to replace the Fast File System (FFS) that is native to the Amiga, and breaks the 4GB barrier that limits the FFS.
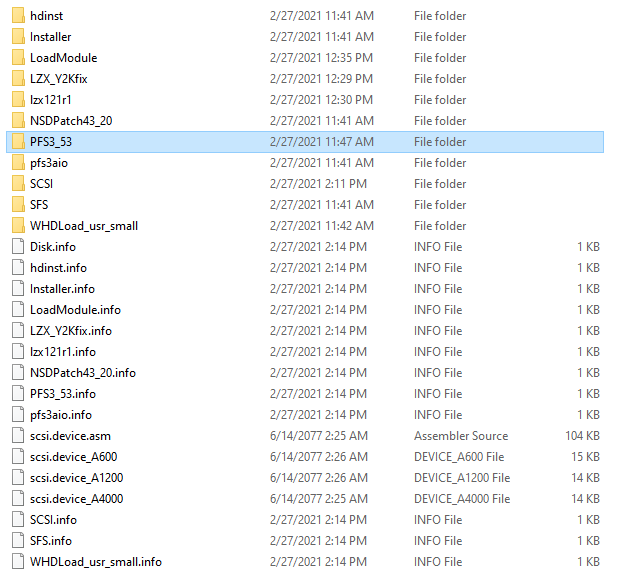
I created a folder in Windows called “Work”, then I downloaded all the LHA files into that folder. I used 7-Zip in Windows to extract every LHA file into its own directory in the Work folder. You should also download and extract the following file, not mentioned in the video above, as it contains very important tools we need to format the partitions we create:
http://aminet.net/package/disk/misc/PFS3_53
You will generally have a folder that looks like this. I have a few extra folders in mine due to my playing around with other install helpers and file systems.
Back in WinUAE, I mounted that Work folder as a directory based hard drive for access in the emulator using the device name WRK:, and the volume name Work.
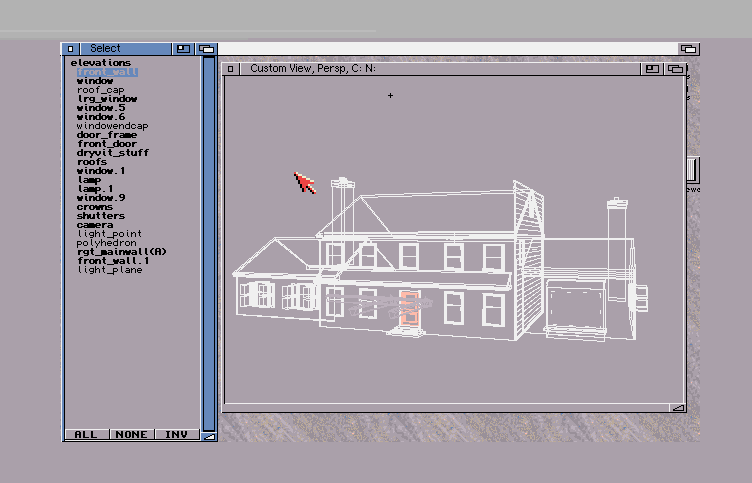
Finally, I had the OS 3.1 install disks in ADF format ready for access in Windows, and mounted the Install disk in the floppy drive setting of WinUAE. Then after configuring WinUAE as an Amiga 1200 with Kickstart 3.0 (matching my real Amiga 1200), and setting at least 4MB Fast RAM, I launched the emulator to see this:
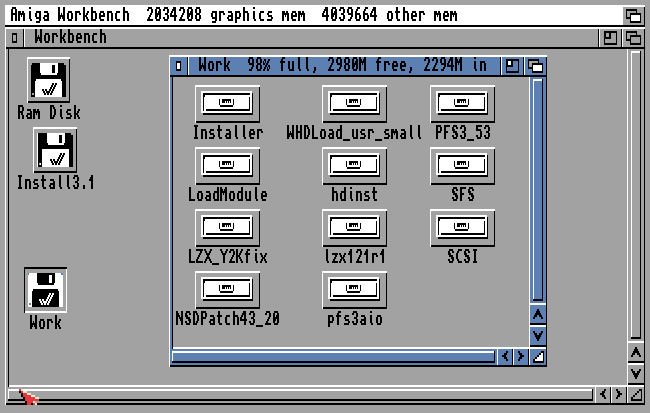
I opened the Work drive to show you that the folders I created in the Windows Work folder now show up in WinUAE as content in a disk volume called Work. You MAY need to choose “Show All Files” in Workbench to see the actual folders in the WinUAE emulation.
At this point, I started following instructions I found here:
http://eab.abime.net/showpost.php?p=831346&postcount=14
I didn’t go through the detailed instructions step by step. I more or less gleaned the intent of the instructions and followed my own course of action. Basically, I needed to use the HDToolbox program on the Installer disk to set up my SSD drive, and install the PFS filesystem instead of the common FastFileSystem. I’ll summarize my initial steps:
- Double-click the “Install3.1” disk
- Double-click the “HDTools” drawer
- Run “HDToolBox”
If you mounted your SSD device properly in WinUAE, you should see it in the “Hard Drives in System” list. If not, double check your settings in WinUAE.
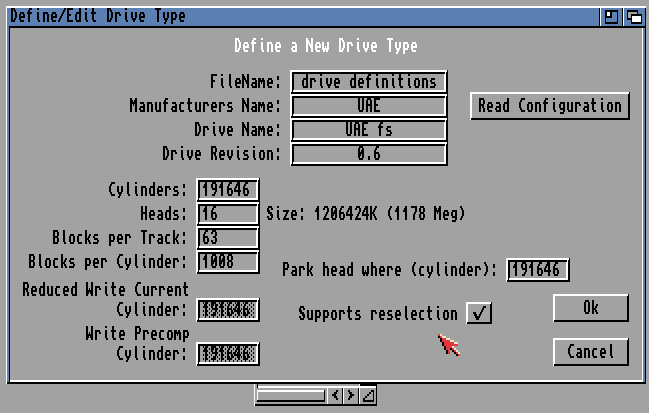
Select the drive and click on “Change Drive Type.” This will open a window to let you define the drive parameters. Click on “Define New…” and it will open a detailed parameters window. Then click on “Read Configuration.” After a notification window pops up, you will now see the Cylinder/Head/Block configuration of your drive. This information is presumed to be correct. The Size it returns WILL NOT be accurately reported for drives larger than 4GB, but the C/H/B information will be correct.
Click OK and you will see your drive listed in the the list of any other drive types that may exits. These drive types are stored on the Install floppy you are using, which is why we will be using the same Install disk/image as needed throughout this tutorial.
Select the new drive type it created and click OK. Next, click on “Partition Drive.” Things will get a little busy here at first, because this is where we will install the PFS file system. The PFS file system will allow us to create partitions beyond the 4GB limitation of Fast File System. This will only be the first part of the large drive access capability we install on the Amiga drive.
Two partitions are automatically defined for you by HDToolBox. Click on the last partition in the partition map graphic and delete it. We have to define partitions in a more careful manner because HDToolBox will assume the drive is whatever size it thought the disk was when we loaded its C/H/B parameters. You can’t delete the first partition. It automatically defines that for you, but we do need to change it.
Click on the first partition and click the “Advanced Options” checkbox. It is here where we’ll install the PFS file system. Click on the “Add/Update…” button. If you see the Fast File System in the list that appears, select it and delete it. If left here, it too will get installed on the hard drive and we don’t need it here to confuse the real Amiga.
Click on “Add New File System…” You will be prompted for a filename for the new file system file. If you mounted the Work disk in WinUAE as described above, and you also extracted the PFS3AIO.lha file into its own folder in Work, then the full file path you need to type in this prompt is:
Work:pfs3aio/pfs3aio
You’re targeting the actual PFS3AIO file that was in its original archive. If yours is in a different location on your mounted Work drive, you need to substitute its full path instead. Click OK. You should see a window like this:
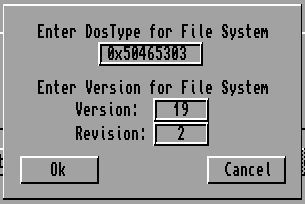
The DosType value may look different. Change it to the value shown above, 0x50465303, then press Enter. On any of the text fields in the HDToolBox program throughout this tutorial, you should press Enter after every entry. Clicking or TABing on another entry does not guarantee your typed value(s) will be saved. You can leave the Version and Revision values alone. They are for reference only. Click OK. You will now see the new file system as a “Custom File System.” Click OK again.
Next, click “Change…” This is where we will change the file system for the first partition to use PFS, not FFS. Click the “File System” control until you see PFS\03.” This selects PFS as the file system to use for the partition. Make sure “Automount this partition” is checked, and replace the value in “MaxTransfer” with 0x0001FE00, then press Enter. Everything else can stay the same, then click OK.

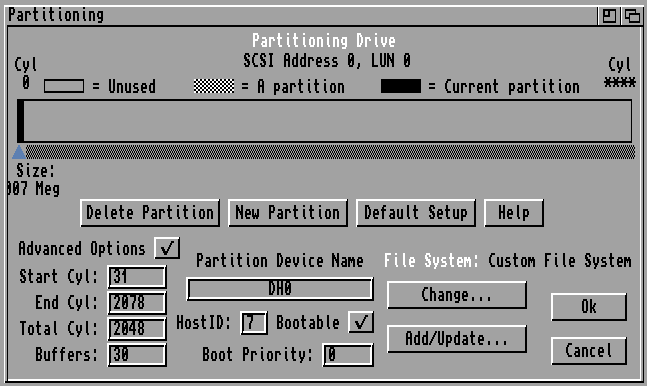
Next, we’ll define the size and device name to this partition. For best results, keep the first partition under 2GB. I found that 1GB, or anything close to that size, works well. You’ll see the “Total Cyl:” box will be a large value. You need to type in a smaller value here. You do not have the luxury of sliding the partition size control in the partition map like you do with a much smaller disk in the system as the size value rolls over every 4GB as you drag the size bar. Instead, start with a Total Cyl: value of 512 and see what partition size it reports for the partition in the partition map. I like to use nice, round binary decimal equivalents, like 512, 1024, 2048, 4096, etc. I just keep increasing the value by multiples of 512 or 1024 (hitting Enter afterwards) until I see a partition size near 1GB. If you can’t read the partition size because it’s tucked under the left side of the window, you can actually drag the partition block (black bar) to the middle of the graphic while you adjust the size (see below). Once you get a suitable size, make sure to drag the partition block fully back to the left again. As you can see, I had to use the value 2048 to get a partition that was 1007MB in size. You will also notice that I renamed the “Partition Device Name” to DH0 out of general popular convention in the world of Amiga. HDToolBox tends to prefix this value with an additional letter by default. One more thing… Set the number of “Buffers” to 100 (not shown below) and make sure the partition is bootable (see the checkbox) and click OK.
DO NOT CREATE ANY OTHER PARTITIONS AT THIS TIME. Doing so could cause problems at first when we install a scsi.device module later on in this tutorial.
You should now see that the drive status now says, “Changed.” At this point, click “Save Changes to Drive” to save the new drive configuration, which also installs PFS in the boot block. If you get an error while saving, make sure you were running WinUAE in Administrator mode, or you may need to go back to the beginning of this tutorial and select uaehf.device to mount the hard drive in WinUAE settings.
If no errors occur, click OK. You should be prompted to reboot. Click on “Continue” to reboot.
You should now see a “DH0:NDOS”, or whatever device you named the partition if everything was successful so far. Next, we need to format this partition. However, we cannot use the AmigaDOS Format command or Workbench “Format Disk…” feature, as those are not aware of the PFS file system. Instead, we need to run the PFSFORMAT program. If you download and extracted the PFS3_53.lha file mentioned above, you will have the PFSFORMAT program ready to use. Assuming you gave your partition the device name DH0:, you can choose “Execute Command” from the Workbench menu and type in:
Work:pfs3_53/pfs3/tools/pfsformat drive DH0: name Main
…then click OK. Substitute your device name for DH0: if you used something different. You can also name the drive whatever you wish instead of “Main.” One common convention is to call the main boot partition, “Workbench”
You’ll be prompted to press Enter to continue, then it will go through a rather slow formatting process, telling you each cylinder it’s formatting, along with the highest cylinder number it will be formatting. Wait this process out…
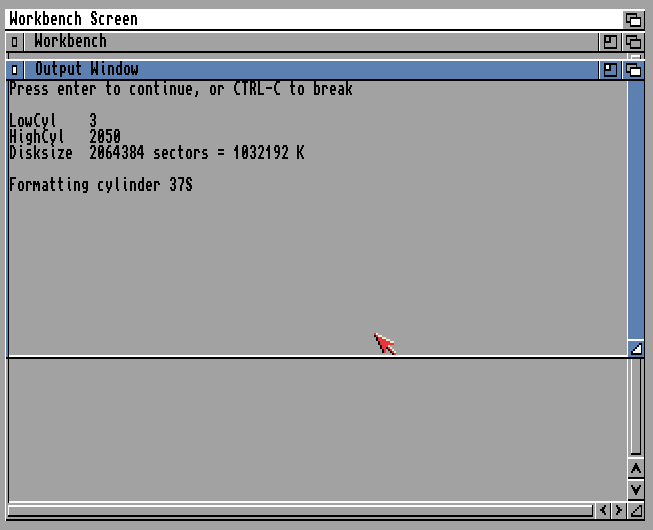
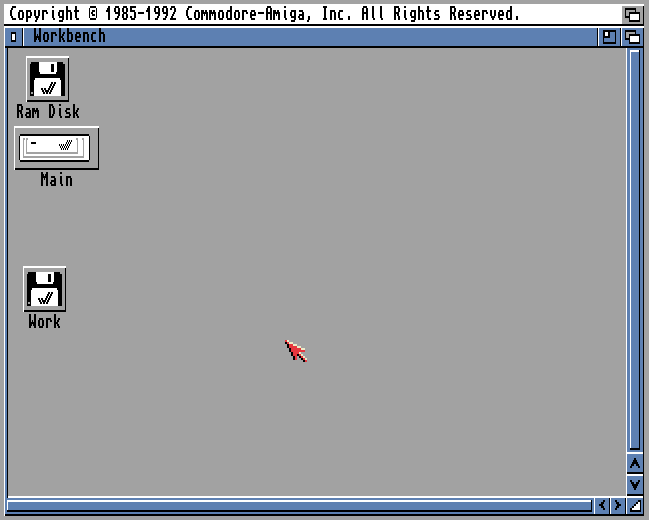
When the formatting is finished, An informational pop-up will appear with info about the PFS file system. It will disappear momentarily, or you can click it away. Afterwards, just close the Output Window that was opened to do the format. If all goes well, you should see your newly formatted drive in Workbench. Open it up and make sure it looks good.
If you have a set of real Workbench 3.1 install disks to use in your Amiga 1200, you should be able to close out WinUAE right now and install your drive in your Amiga 1200 to do a conventional install. This would also be a useful next step just to see if your Amiga 1200 will accept and use your new drive. For me, since I have a bad floppy drive, or if you simply want to continue the install process in WinUAE, you can perform the Workbench 3.1 install in WinUAE using ADF files. I would highly recommend continuing to work in emulation for the rest of the tutorial. If you’re really concerned about your SSD drive not working on your real Amiga 1200 at this time, feel free to shut down WinUAE, connect your drive to the Amiga, and see if it boots. If it works, bring the drive back to your PC and get everything back into the running emulation again. You’ll have more resources available to you in emulation.
I’m not going to go into detail on how to use WinUAE to install Workbench 3.1. Chances are, if you’re already comfortable enough using WinUAE to do this large drive partitioning, you most likely know how to swap disks in the emulator to go through the motions of installing Workbench. I just recommend you set the floppy settings in WinUAE to “Turbo” to make the process run faster.
At the end of the Workbench install, you will be prompted to reboot the Amiga. Eject your Install disk, either your real disk or in the emulator, then click “Proceed” to reboot. If all went well, your computer (or emulator) will boot off of the new partition you created.
If you tested your drive in a real Amiga 1200, you should put it back in WinUAE as described before, including the mounting of the Work directory, and booting from the same Workbench 3.1 Install ADF disk. That disk has the drive type already configured for your large drive. If you are still operating in emulation, you can freely continue with this tutorial as is, because I’m sure you will want to create more partitions to consume the remaining drive space.
Using and booting from the same (ADF) Install disk, run the HDToolBox program and you should see your drive in a “Not Changed” status. To add another partition, click on “Partition Drive.”
Choose “New Partition”, and use the same setup and parameters as described above to configure the new partition. I recommend creating partitions no bigger than 8GB for the simple reason that formatting such large partitions with PFSFORMAT will take a LOOOOOONG time. A 4GB partition could take more than an hour. But then again, it’s the price we have to pay for the convenience of large partitions.
Do note that partition sizes larger than 4GB will show an incorrect partition size in the partition map due to the fact that it loops around to a zero value every 4GB. You need to keep track of your partition size based on the multiple of the “Total Cyl:” value that is used to create a 1GB, 2GB, or 4GB partitions respectively.
Remember to go into “Advanced Options” and “Change” the partition type to PFS\03 for each new partition you want to add, with the MaxTransfer value of 0x0001FE00.
Updating the scsi.device
Before we can fully take advantage of a large hard disk, we need to be able to let the Amiga 1200 access partitions which start or extend past the first 4GB of the drive. To do this, we need to modify the behavior of the scsi.device file in AmigaDOS.
We won’t really be updating the scsi.device file directly, even though that is an alternative solution using various downloadable patch files and patching your existing DEVS:scsi.device file. But to do so, you need to know which version of scsi.device you have and use the correct patch file. Too convoluted for my needs. Instead, we’ll simply use LoadModule in the S:Startup-Sequence file to load a module that patches scsi.device in RAM on each boot. So, in continuing the instructions posted on the same website describing the installation of PFS, e.g. http://eab.abime.net/showpost.php?p=831346&postcount=14 we will be installing a new SCSI device module.
Those instructions point you to a SCSI.LZX file to download. If you have the capability to extract an LZX file, you can use their link. However, 7-Zip for Windows will not open them. You can find the LZX program for the Amiga and try to extract the SCSI.LZX file in emulation or whatever, but since the original LZX program was shareware, you have jump through hoops to install its keyfile into your Amiga’s L: directory before running LZX. So for convenience, I repacked the contents of SCSI.LZX into an LHA file, which you can download here:
http://vintagevolts.com/wp-content/uploads/scsi.lha
Download that archive and extract it to your Work folder like you did with the programs and files earlier in this tutorial.
You’ll also need to download and extract LoadModule.lha from the AmiNET website into your Work folder.
http://aminet.net/package/util/boot/LoadModule
To install the necessary commands and modules to modify the scsi.device behavior, we need to get back into our freshly installed large drive Workbench environment and copy a few files from our Work drive into the main Workbench boot drive. So, if you are not already in the emulated environment, get back into it using the same hard drive settings used when we started emulation in this tutorial. Then open up an AmigaDOS Shell. You can find Shell in the Workbench System folder.
The next few steps assume you used the same folders and extraction process I used in this tutorial. If you extracted the LHA files into other locations, you will need to substitute the pathnames accordingly.
First, copy the scsi.device_A1200 file to the DEVS: volume:
copy Work:scsi.device_A1200 DEVS:
Next, copy the LoadModule program to the C: volume:
copy Work:LoadModule/LoadModule C:
Now, we need to add a few lines to the beginning of our S:Startup-Sequence file. You can use any editor for this. I prefer to use MEmacs, not only because it’s already installed in our fresh Workbench installation, but also because it’s a full screen interactive editor. You can find the MEmacs icon in Workbench if you like, but since we’re already in an AmigaDOS Shell, let’s just run and open the file from the command line while we are here:
DH0:tools/memacs s:startup-sequence
You should see a well populated Startup-Sequence file in the editor. At the first blank line in the file, you will need to type in the following lines:
IF EXISTS DEVS:scsi.device_A1200
C:LoadModule DEVS:scsi.device_A1200
EndIF
Although you only REALLY need the middle line to invoke the module during boot, the IF block prevents boot halting errors that may occur if for some reason your scsi.device_A1200 turns up missing.
With those changes in place, select Save-Exit from the Project menu to save the changes and exit MEmacs. For those who like using keyboard shortcuts, CTRL-X,CTRL-F will also save and exit.
Now… reset the emulated Amiga. If all goes well, it should still boot properly, but now it will be able to access partitions that occupy space beyond the 4GB point on your drive.
So… let’s add a new partition or two! How about one that is 4GB in size for the next one? This will be a good test of everything because we already have a 1GB partition. An added 4GB partition will not only extend beyond the original 4GB limit in the original Amiga specifications, but it will also allow us to add a third partition that starts past that 4GB mark.
Right now, I recommend you add any and all partitions you want to add. For this tutorial, I will test some waters to verify functionality. You do not want too many partitions, since each partition requires a number of Buffers to be set per partition. Each buffer consumes 1KB of RAM. You are maxed out on your RAM, aren’t you? Setting a buffer size of 100 consumes 100K of RAM. So if you create 10 8GB partitions on an 80GB drive, you will consume 1MB of RAM just to have them mounted. What’s more, it is generally recommended to use more buffers for larger partitions, up to 600 buffers for extensively sized partitions. I will be using 100 buffers for my 4GB and larger partitions, and 200 for partitions of 8GB or more.
It’s best to use the same Workbench 3.1 Install disk you used when first prepping your hard drive, as it now contains the proper drive parameters, and unless you modify the first partition in any way, adding new partitions won’t wipe the contents of your first partition away.
Remount your Install ADF file, reboot the emulated Amiga, and run HDToolBox. You should see your hard drive as before. Its Status should read “Not Changed” and the “Drive Type” will match the value yours displayed previously. Click “Partition Drive.”
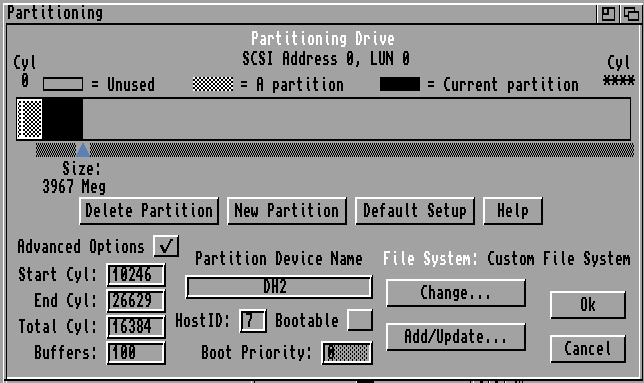
You should now see the partition mapping of your drive. Since this is a large drive, your first partition will be that tiny black bar on the left. Leave this be. Click on “New Partition”, then click anywhere in the empty space of the partition map. This will create a new partition of an arbitrary size. It may even fill the entire blank space of the partition map depending on the size of your drive. Again, the partition size will be incorrect due to the 4GB rollover count mentioned before. But rest assured, it will attempt to create a partition that is as big as it thinks is possible. However, we’re taking baby steps in this tutorial, so we’ll be shrinking the size of this partition to 4GB or so.
Next, we need to click on “Advanced Options” to set some values. Remember the value you typed in the “Total Cyl:” field to get a 1GB partition? Take that number and multiply it by 4. Then set the following values:
- Total Cyl: (the number you calculated above for a 4GB partition)
- Partition Device Name: DH1: (or as per your own naming convention)
- Buffers: 100
Then click the “Change” button to set the partition with the PFS file system using the following values:
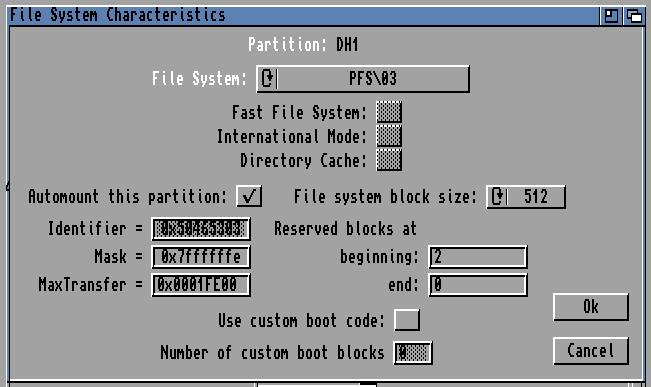
Then click OK. Repeat this process to add an 8GB partition. When you’re done, you should see a partition layout similar to this, but possibly with an empty space different than the example if your drive size is different than mine:
When you’re satisfied you have set up the partitions properly, Click OK, then click “Save Changes to Drive.” Now click “Exit” to finish and allow the emulated Amiga to reboot if it prompts you (it might not), or reboot it yourself. Make sure to eject your virtual Install floppy disk before rebooting.
When (if) the system boots up again, you should now see your new drives as NDOS drives. The drive names may alternately contain garbage characters. These drives need to be formatted …BUT… do NOT use the Format menu item, or the AmigaDOS Format command, on these as mentioned before, as it is not compatible with the PFS file system. Instead, we’re going to install the PFS tools to your C: volume so we can format the partitions properly in an AmigaDOS shell.
Hopefully, during all this, you did not unload the Work folder you attached to the emulator previously. If you did, re-attach it and reboot the emulation. Then, open up a Shell and type the following command (assuming as before that you created your Work folder the same as I did):
copy Work:PFS3_53/PFS3/tools/#? C:
This will copy all the PFS file system tools to your C: volume to allow them to be run like any other AmigaDOS command. Now we can start formatting our partitions. Again, formatting these large partitions takes a LOOOONG time. A 4GB partition could take an hour or more. An 8GB partition even longer.
To start formatting the next partition on the drive, type:
pfsformat DRIVE DH1: NAME Stuff
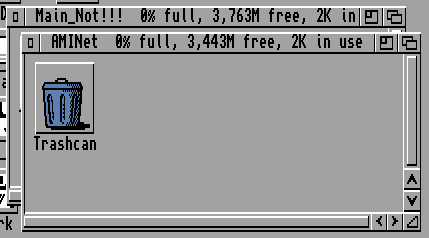
Use the drive name you set up for the partition in HDToolBox, and choose whatever volume name you want for its label. I just used “Stuff” as an example. For me, I like to follow the old style naming conventions I once used back in the day. Wayne’s World and other pop culture language in the early 90s influenced the names of the two drives I had on my 100MB hard drive on my original Amiga 500. I named the first drive “Main”, and the second drive “Main_NOT!!!” 🙂

I created a 4GB partition that I called “Main_Not!!!” and an 8GB partition that I called “AMINet.” As you can see in Workbench, the AMINet partition does not report near 8GB free. This is probably due to the stock Workbench expecting no more than 4GB partition sizes. It’s probably still an 8GB volume, just being reported improperly. The best test for this is for me to mount a Windows folder containing more than 4GB of content and copying all of it into the AMINet volume to see what happens.
As I was copying a large batch of files, I opened up the disk to watch what Workbench reports as content size as files get copied in. This is supposed to be an 8GB drive, but you can see the FREE amount plus the IN USE amount add up to nearly 4GB. However, notice the disk use percentage. It’s reporting 21%, which is about correct for 1.59GB of data in an 8GB drive. So even if the actual numbers don’t add up, the percentage amount seems to be accurate.
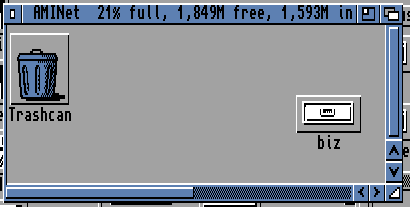
I’m actually having a hard time finding more than 4GB of files to put on this partition to test the theory. LOL. It seems I probably have all the space I would need with this large drive solution for whatever I wish to use with it.
As I mentioned above, the 128GB mSATA-IDE solution did not work on my real Amiga 1200. But it looks like the process using PFS is working fine, and without any problems, when I use it in emulation. Perhaps this mSATA solution would work on an Amiga 4000. I’m not sure what PIO mode the IDE controller supports on a 4000. However, the 64GB SSD I bought from Amazon works on my Amiga 1200. As I type this, I just started formatting a 16GB partition I created on the Amiga 1200, which is both well past the 4GB offset of the drive and well beyond the 4GB size that FFS is limited to. I’ll just have to wait and see how things look after the format is completed. Perhaps I can watch all ten seasons of Stargate SG-1 while is formats. LOL
After the partition formats on the real Amiga, I will put that drive back in emulation on WinUAE to copy to that partition a lot of what I have archived over the years. Then I shall put the newly updated system to work and see how it all behaves during normal use.
BTW, I created a 16GB partition on my 64GB drive while mounted in my Amiga 1200. It took pfsformat nearly EIGHT HOURS to format the drive, but it does work, and I still have plenty of room to ad partitions at a later date if needed. I’ve partitioned about 32GB of the drive so far at a cost of 1MB Fast RAM for buffer overhead.
Here is my drive layout:
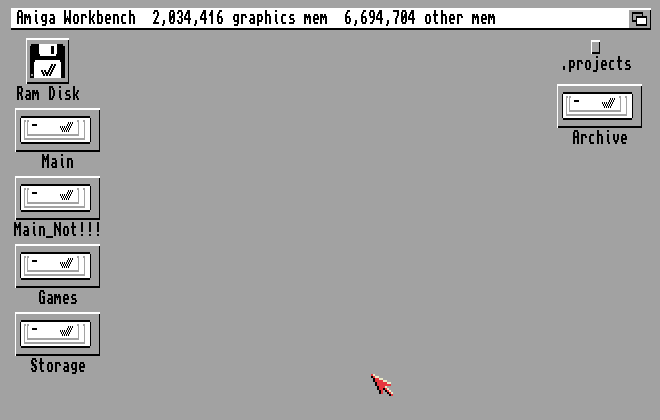
Main: 1GB
Main_Not!!!: 4GB
Games: 4GB
Storage: 8GB
Archive: 16GB
All partitions seem to be working just fine.
UPDATE – 4 MAR 2021
Less than a week after I produced this tutorial, I reconsidered the number of partitions I wanted at one time on the disk. I lost almost 1.5MB of Fast RAM with five partitions, so I decided to remove the top three partitions, then make a single 54GB partition. I’ll just create folders in that partition which mimic separate drives, then pull the drive folders out onto Workbench to make them appear to be independent drives. I can use ASSIGN: to give each of those folders a volume name of their own, so it’ll be hard to tell that those are folders and not entire drives. However, I reduced the Fast RAM footprint for buffers down to under 1MB by doing this.